Two Main StepsSystem Maximizer STEP 1 and STEP 2 prepare the machine for low-latency live audio use.
Remote ControlAfter testing, the most stable setup is a fixed-IP network host controlled remotely.
Step-by-Step
Step 0
Leave BIOS at Default
- It is recommended to leave the BIOS in its default state.
- System Maximizer and LiveSoundHost are designed to pull maximum performance from Windows while the BIOS remains at default settings.
- For example, changing C-state or Turbo-related options can reduce performance instead of improving it.
- If your environment has no noise concerns and you want to minimize audio glitches as much as possible while pushing ASIO buffer sizes lower, setting the CPU fan to a fixed 100% speed is recommended.
Step 1
Install Windows 11
- Warning! This Windows installation method automatically erases and partitions the HDD/SSD, so make sure to use an empty drive.
- Download the Windows 11 Disk Image (ISO) for x64 devices from microsoft.com.
- As of May 2026, the file currently provided for download is Win11_25H2_English_x64_v2.iso (26200.8037 Mar 2026 Consumer version), and both LiveSoundHost and System Maximizer were fully tested on this version.
- Use Rufus to create a bootable USB installer from the ISO.
- Download the LiveSoundHost autounattend.xml (May 14, 2026 version) file into the root of the boot USB, then boot from that USB and begin installation.
- This unattended setup removes unnecessary Windows bloat before installation and installs an optimized Windows 11 Pro configuration automatically, using a generic key.
- The autounattend.xml file was generated with schneegans.de/windows/unattend-generator (May 14, 2026 version). You can upload the file there to review or customize the applied tweaks.
Important: If you skip the autounattend.xml stage, System Maximizer may not work as intended.
Step 2
Run System Maximizer STEP 1
- Press Check All, then press STEP 1 & REBOOT.
- This stage disables services that are not needed for a stable dedicated live-audio system.
- Do not connect the computer to the internet before completing this stage.
- If Windows goes online too early, it may start automatic updates and other background behavior that work against the intended dedicated-audio configuration.
Step 3
Install Required Drivers and Activate
- After the STEP 1 reboot, install the network driver, including Wi-Fi if needed, and install the drivers for your audio interface or digital mixer.
- Only then connect the computer to the internet.
- Activate your LiveSoundHost license once network access is available.
- If required, complete online activation for your VST3 plugins and for Windows 11 Pro as well.
Recommendation: If this machine is dedicated to LiveSoundHost and not intended for gaming or general desktop use, it is better not to install unnecessary graphics or chipset driver packages unless they are actually required.
Step 4
Run System Maximizer STEP 2
- Press Check All, then press STEP 2 & REBOOT.
- This stage applies registry and kernel-level tuning to maximize system capability and prepare the machine for ultra-low-latency operation.
- To run more VST3 instances without glitches, setting the CPU fan to run at 100% continuously in BIOS can help the system sustain heavier processing loads.
Step 5
Launch LiveSoundHost and Fine-Tune CPU Distribution
- After STEP 2 and reboot, LiveSoundHost will already make strong use of multi-core performance by default.
- If desired, you can go further with STEP 3: Device IRQ Steering in System Maximizer to distribute device interrupts to specific CPU cores.
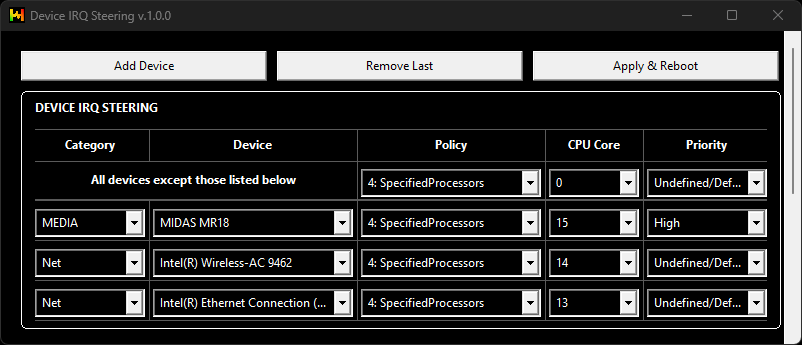
Best Practice: Assign the audio device with high priority, along with any required network device, to the last CPU cores, usually E-cores, and assign all other devices to CPU core 0. - You can also use LiveSoundHost CPU Steering to concentrate Engine, Record, Playback, Network, UI, and System processes onto specific cores to build a more stable system around your exact hardware and workload.
Step 6
Test Everything Before Production
- Before using the system in a real production environment, test every major feature thoroughly.
- Pay special attention when running ASIO Record and ASIO Playback at the same time as the VST3 Host.
- Use the built-in pink noise generator to fully drive your VST3 plug-in during testing, and check the glitch counter to verify long-duration stability without having to listen continuously for glitches under your expected real-world session load.
- If needed, increase the ASIO buffer size to achieve stable operation.
Step 7
Operate as a Fixed-IP Host on a Local Network
- After testing is complete, assign a fixed local IP address to the LiveSoundHost computer.
- The most stable operating method is to use it as a network host with only power and Ethernet, or local Wi-Fi if necessary, connected.
- Run it without a monitor, keyboard, or mouse, and control it using the dedicated Windows remote app, the dedicated Android remote app, or, on Mac, the web remote on port 20831.
- This approach reduces local graphics, mouse, and keyboard interrupt activity and can allow lower ASIO buffer settings with fewer glitches.
Security: For maximum security, it is recommended to operate the system on a local-only network environment rather than exposing it beyond the local network.
Note: You can use the Microsoft RDP protocol if needed, but because it sends and receives graphics packets, it can cause a noticeable increase in audio glitches. The dedicated remote options are designed so that all LiveSoundHost functions can be controlled remotely without relying on RDP.
For the most reliable results, treat the machine as a dedicated live-audio system, not as a general-purpose PC.